modify_sysctl.py

[code lang=python] # -- coding: utf-8 -- ‘’’ Created on 2015-1-21 @author: xie ‘’’ ‘’’ net.ipv4.tcp_rmem = 4096 87380 16777216 net.ipv4.tcp_wmem = 4096 65536 16777216 net.core.wmem_default = 8388608 net.core.rmem_default = 8388608 net.core.rmem_max = 16777216 net.core.wmem_max = 16777216 net.core.netdev_max_backlog = 30000 net.core.somaxconn = 65535 net.ipv4.tcp_max_syn_backlog = 262144 net.ipv4.tcp_max_tw_buckets = 6000 net.ipv4.tcp_tw_recycle = 1 net.ipv4.tcp_tw_reuse = 1 net.ipv4.tcp_fin_timeout = 30 net.ipv4.ip_local_port_range = 9000 65535 net.ipv4.tcp_syncookies = 1 net.ipv4.tcp_max_orphans = 262144 net.ipv4.tcp_synack_retries = 2 net.ipv4.tcp_syn_retries = 2 ‘’’ import re,commands SYSCTL_CONFIG = ‘/etc/sysctl.conf’ class SetSysctl(): def __init__(self): self._sysctls = [] self._sysctls.append(‘net.ipv4.tcp_rmem = 4096 87380 16777216’) self._sysctls.append(‘net.ipv4.tcp_wmem = 4096 65536 16777216’) self._sysctls.append(‘net.core.wmem_default = 8388608’) self._sysctls.append(‘net.core.rmem_default = 8388608’) self._sysctls.append(‘net.core.rmem_max = 16777216’) self._sysctls.append(‘net.core.wmem_max = 16777216’) self._sysctls.append(‘net.core.netdev_max_backlog = 30000’) self._sysctls.append(‘net.core.somaxconn = 65535’) self._sysctls.append(‘net.ipv4.tcp_max_syn_backlog = 262144’) self._sysctls.append(‘net.ipv4.tcp_max_tw_buckets = 6000’) self._sysctls.append(‘net.ipv4.tcp_tw_recycle = 1’) self._sysctls.append(‘net.ipv4.tcp_tw_reuse = 1’) self._sysctls.append(‘net.ipv4.tcp_fin_timeout = 30’) self._sysctls.append(‘net.ipv4.ip_local_port_range = 9000 65535’) self._sysctls.append(‘net.ipv4.tcp_syncookies = 1’) self._sysctls.append(‘net.ipv4.tcp_max_orphans = 262144’) self._sysctls.append(‘net.ipv4.tcp_synack_retries = 2’) self._sysctls.append(‘net.ipv4.tcp_syn_retries = 2’) self._sysctls.append(‘’) self._sysctls.append(‘kernel.core_pattern = /home/core/core.%p’) self._create_core() self._read_sysctl() self._write_sysctl() def _read_sysctl(self): network = open(SYSCTL_CONFIG, ‘r’) self._lines = [] for line in network: flag = False for sysctl in self._sysctls: regex_str = sysctl.split(‘=’)[0] ma = re.match(r’^‘+regex_str+’.*?‘, line, re.IGNORECASE) if ma: flag = True break; if not flag: self._lines.append(line) network.close() def _write_sysctl(self): sysctls = open(SYSCTL_CONFIG, ‘w’) self._lines.extend(self._sysctls) sysctls.write(’\n’.join(self._lines)) sysctls.close() commands.getoutput(‘sysctl -p’) def _create_core(self): commands.getoutput(‘mkdir /home/core’) commands.getoutput(‘chown -R mc-ops:mc-ops /home/core’) if __name__ == ‘__main__’: SetSysctl() [/code]

modify_ulimit.py

[code lang=python]
# -- coding: utf-8 -- #!/usr/bin/env python2.7 ‘’’ Created on 2013-5-6 @author: xie ‘’’ import commands, re,os LIMIT_CONF = ‘/etc/security/limits.conf’ SOFT_NOFILE = ‘* soft nofile 1048576\n’ HAND_NOFILE = ‘* hard nofile 1048576\n’ SOFT_NPROC = ‘* soft nproc 1048576\n’ HAND_NPROC = ‘* hard nproc 1048576\n’ PROFILE_CONF = ‘/etc/profile’ ULIMIT_NOFILE = ‘ulimit -HSn 1048576\n’ NPROC_LIMIT_CONF = ‘/etc/security/limits.d/90-nproc.conf’ def modify_ulimit(): lines = [] ulimit = open(LIMIT_CONF, ‘r’) for line in ulimit: ma = re.match(r’.?soft ?‘, line, re.IGNORECASE) mx = re.match(r’.?hard ?‘, line, re.IGNORECASE) if ma or mx: continue lines.append(line) ulimit.close() lines.append(SOFT_NOFILE) lines.append(HAND_NOFILE) lines.append(SOFT_NPROC) lines.append(HAND_NPROC) ulimit = open(LIMIT_CONF, ‘w’) ulimit.write(’‘.join(lines)) ulimit.close() commands.getoutput(‘ulimit -HSn 1048576’) if not isCentos7(): modify_nproc_ulimit() writeProfile() def modify_nproc_ulimit(): lines = [] if os.path.exists(NPROC_LIMIT_CONF): ulimit = open(NPROC_LIMIT_CONF, ‘r’) for line in ulimit: ma = re.match(r’.?soft ?‘, line, re.IGNORECASE) if ma: continue lines.append(line) ulimit.close() lines.append(’ soft nproc 1048576\n’) lines.append(‘root soft nproc unlimited\n’) ulimit = open(NPROC_LIMIT_CONF, ‘w’) ulimit.write(‘’.join(lines)) ulimit.close() def writeProfile(): lines = [] flag = False profile = open(PROFILE_CONF, ‘r’) for line in profile: ma = re.match(r’.?ulimit -HSn 1048576.‘, line, re.IGNORECASE) if ma is not None: flag = True lines.append(line) profile.close() if flag == False: lines.append(ULIMIT_NOFILE) profile = open(PROFILE_CONF, ‘w’) profile.write(’‘.join(lines)) profile.close() def isCentos7(): mage = commands.getoutput(‘cat /etc/redhat-release’).split(’\n’) #CentOS Linux release 7.1.1503 (Core) #CentOS release 6.6 (Final) cP = re.compile(r’.\s+(?P\d+).*', re.IGNORECASE) for mess in mage: ma = cP.match(mess) if ma is not None: ip = ma.group(‘release’) if ip == ‘7’: return True return False pass if __name__ == ‘__main__’: modify_ulimit() [/code]
()标相应英文单词 []标音标 =====公司/产品名===== Youtube (You-tube [tju:b]) 念 优tiu啵 不念 优吐毙 Skype [ˈskaɪp] 念 死盖破 不念 死盖屁 Adobe [əˈdəʊbi] 念 阿兜笔 不念 阿斗伯 Chrome [krəʊm] 念 克肉姆 C# (C Sharp) 念 C煞破 GNU [(g)nuː] 念 哥怒 GUI [ˈɡui] 念 故意 JAVA [ˈdʒɑːvə] 念 扎蛙 不念 夹蛙 AJAX [ˈeɪdʒæks] 念 诶(ei)贾克斯 不念 阿贾克斯 Ubuntu [uˈbuntuː] 念 巫不恩兔 不念 友邦兔 Debian [ˈdɛbiən] 念 得(dei)变 Linux [ˈlɪnəks] [ˈlɪnʊks] 两种发音 丽娜克****斯李扭克斯 都可以 LaTeX [ˈleɪtɛk] [ˈleɪtɛx] [ˈlɑːtɛx] [ˈlɑːtɛk] 雷泰克拉泰克 都可以 (根据Knuth的建议,雷泰克斯拉泰克斯不正确。而且LaTeX的重音是放在上。感谢@Rio讨论。另外感谢发音大牛@梁海刚刚指出, [ˈlɑːtɛx] 注音符号里的x发的不是克斯的音,而是接近“巴赫”的那个。) GNOME [ɡˈnoʊm] [noʊm] 两种发音 格弄姆 弄姆 都可以 App [ˈæp] 念阿破(与爱破也比较像,参见音标),不能把三个字母拆开念成A P P。 =====一般英语===== null [nʌl] 念 jpg [ˈdʒeɪpɛɡ] 念 zhei派个 不念 勾屁记 WiFi [ˈwaɪfaɪ] 念 歪fai mobile [moˈbil] [ˈmoˌbil] [ˈməubail] 膜拜哦牟bou 都可以 integer [ˈɪntɪdʒə] 念 音剃摺儿 不念 阴太阁儿 cache [kæʃ] 念 喀什 不念 卡尺 @ 念 at =====感谢@Lawrence Li同学的补遗===== Tumblr (Tumbler) 念 贪不勒 nginx (Engine X)念 恩静 爱克斯(@Lawrence Li有不同意见) Apache [əˈpætʃiː] 念 阿趴气 Lucene [ˈluːsin] 念 鲁信 MySQL [maɪ ˌɛskjuːˈɛl] [maɪ ˈsiːkwəl] 念 买S奎儿买吸扣 都可以 Exposé [ɛksˈpəʊzeɪ] 念 埃克斯剖Z (重音在Z上) RFID 【本条争议颇大】:有人念af rid, ri fid,但是RFID官方念法依然是四个字母分开读R F I D JSON (jason) 念 zhei森 Processing [ˈprəʊsesɪŋ] 重音在Pro上 avatar [ˌævə’tɑr] 念 艾瓦塌儿 作者:Filestorm 链接:https://www.zhihu.com/question/19739907/answer/12960562 来源:知乎 著作权归作者所有,转载请联系作者获得授权。

Jun 24, 2015 With gulp 3.9, we are now able to use ES6 (or ES2015 as it’s now named) in our gulpfile—thanks to the awesome Babel transpiler. Firstly make sure you have at least version 3.9 of both the CLI and local version of gulp. To check which version you have, open up terminal and type:

gulp -v

This should return:

CLI version 3.9.0
Local version 3.9.0

If you get any versions lower than 3.9, update gulp in your package.json file, and run the following to update both versions:

npm install gulp && npm install gulp -g

Creating an ES6 gulpfile

To leverage ES6 you will need to install Babel (make sure you have Babel 6) as a dependency to your project, along with the es2015 plugin preset:

npm install babel-core babel-preset-es2015 --save-dev

Once this has finished, we need to create a .babelrc config file to enable the es2015 preset:

touch .babelrc

And add the following to the file:

{
  "presets": ["es2015"]
}

We then need to instruct gulp to use Babel. To do this, we need to rename the gulpfile.js to gulpfile.babel.js:

mv "gulpfile.js" "gulpfile.babel.js"

We can now use ES6 via Babel! An example of a typical gulp task using new ES6 features:

'use strict';

import gulp from 'gulp';
import sass from 'gulp-sass';
import autoprefixer from 'gulp-autoprefixer';
import sourcemaps from 'gulp-sourcemaps';

const dirs = {
  src: 'src',
  dest: 'build'
};

const sassPaths = {
  src: `${dirs.src}/app.scss`,
  dest: `${dirs.dest}/styles/`
};

gulp.task('styles', () => {
  return gulp.src(paths.src)
    .pipe(sourcemaps.init())
    .pipe(sass.sync().on('error', plugins.sass.logError))
    .pipe(autoprefixer())
    .pipe(sourcemaps.write('.'))
    .pipe(gulp.dest(paths.dest));
});

Here we have utilised ES6 import/modules, arrow functions, template strings and constants. If you’d like to check out more ES6 features, es6-features.org is a handy resource.

SUMMARY This article describes how to create a Windows registry file to configure the proxy server settings on a client computer that is running Microsoft Internet Explorer or Windows Internet Explorer.

MORE INFORMATION

You can automatically configure the proxy server settings on a client computer by updating the client computer registry. To do this, create a registry file that contains the registry settings you want to update, and then distribute it to the client computer by using a batch file or logon script. Important This section, method, or task contains steps that tell you how to modify the registry. However, serious problems might occur if you modify the registry incorrectly. Therefore, make sure that you follow these steps carefully. For added protection, back up the registry before you modify it. Then, you can restore the registry if a problem occurs. For more information about how to back up and restore the registry, click the following article number to view the article in the Microsoft Knowledge Base: 322756 How to back up and restore the registry in Windows To configure the proxy server settings on a client computer, create the following .reg file to populate the registry with the proxy server information:

Regedit4

[HKEY_CURRENT_USER\Software\Microsoft\Windows\CurrentVersion\Internet Settings]
"MigrateProxy"=dword:00000001
"ProxyEnable"=dword:00000001
"ProxyHttp1.1"=dword:00000000
"ProxyServer"="http://ProxyServername:80"
"ProxyOverride"="<local>"

In this file, ProxyServername is the name of your proxy server. You can also use the Internet Explorer Administration Kit (IEAK) to configure proxy server settings on client computers. For additional information about IEAK, visit the following Microsoft Web site: http://technet.microsoft.com/en-us/ie/bb219520.aspx

        Properties

Article ID: 819961 - Last Review: 09/11/2011 07:27:00 - Revision: 2.0

    <span>Applies to</span>
    <p>
        Windows 7 Enterprise, Windows 7 Enterprise N, Windows 7 Home Basic, Windows 7 Home Premium, Windows 7 Home Premium N, Windows 7 Professional, Windows 7 Professional N, Windows 7 Starter, Windows 7 Starter N, Windows 7 Ultimate, Windows 7 Ultimate N, Windows Internet Explorer 8, Microsoft Internet Explorer 6.0, Windows Internet Explorer 7 for Windows XP, Windows Internet Explorer 7 for Windows Server 2003


    <span>Keywords: </span>
    <ul><li>
            kbisa2004yes kbinfo KB819961 
        </li></ul>


    <h5>Feedback</h5>


            <span>Was this information helpful?</span>

        </p>

npm install In my case, command nssm install MyWebService… was unsuccessful, the problem was that app.js can’t find config.json file.

First you will need:

  1. Node.js application (project) which you want to run as a Windows Service
  2. Node.js
  3. NSSM

1 step: Set your Node.js application as Windows Service

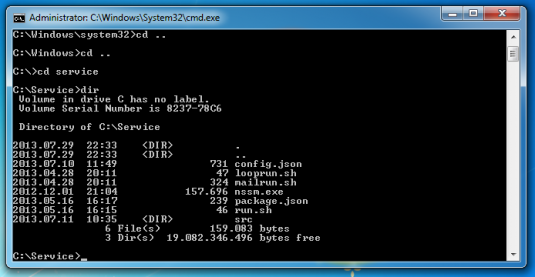
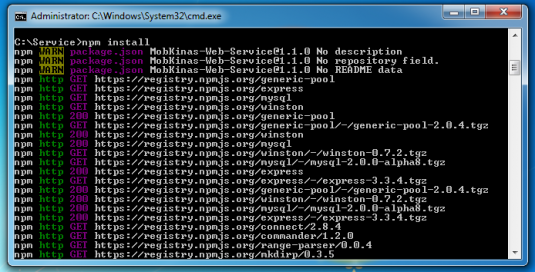
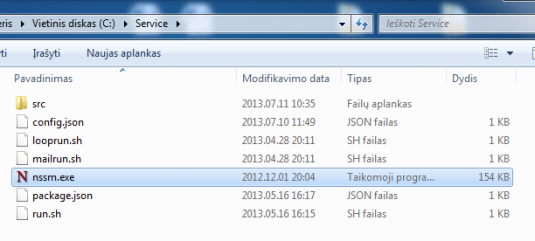
Download nssm.exe and put file into you node.js project folder Put nssm.exe file into you node.js project folder Run Windows Command Processor (cmd.exe) as administrator and go to your node.js project folder Your node.js project folder Run command npm install npm install Run command node src\app.js and allow access through Windows firewall Allow access through Windows firewall Run these two commands nssm.exe install MyWebService “C:\Program Files\nodejs\node.exe” “C:\Service\src\app.js” net start MyWebService net start MyWebService Now we need to fix this error.

2 step: Edit registry

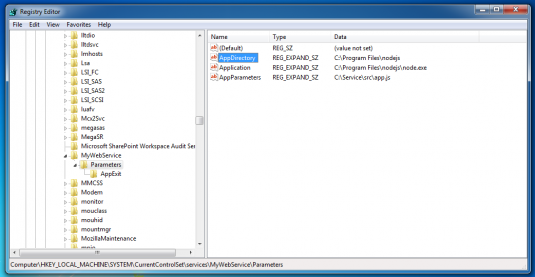
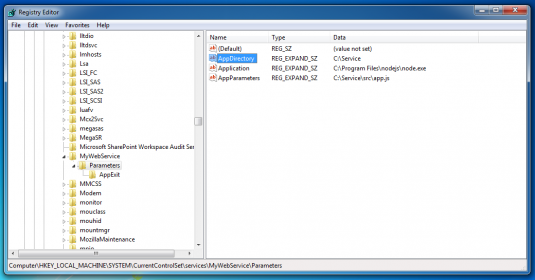
Open registry editor (regedit.exe) and go to HKEY_LOCAL_MACHINE\SYSTEM\CurrentControlSet\services\MyWebService\Parameters HKEY_LOCAL_MACHINE\SYSTEM\CurrentControlSet\services\MyWebService\Parameters Now we need to change AppDirectory from C:\Program Files\nodejs to C:\Service Change AppDirectory from C:\Program Files\nodejs to C:\Service Restart computer and don’t forget to run Apache, MySQL or any other necessary servers for your project after restart. Node.js Application as a Windows Service

漏洞编号:CVE-2016-5195

漏洞名称:脏牛(Dirty COW)

风险等级:高危

漏洞危害:

黑客可以通过远程入侵获取低权限用户后,在服务器本次利用该漏洞在全版本Linux系统上实现本地提权,从而获取到服务器root权限。

漏洞利用条件:

黑客可以通过远程入侵获取低权限用户后,才能进一步在操作系统本地利用该漏洞。

漏洞影响范围

  1. Linux Kernel >= 2.6.22 的所有 Linux 系统 意味着从 2007 年发布 2.6.22 版本开始,直到2016年10月18日为止,这中间发行的所有 Linux 系统都受影响。 我们建议您使用以下方式自查是否存在此漏洞:
  • 使用安骑士“安全基线检查 - 高危漏洞应急检查 ”功能自动检查,修复漏洞后,可以自动验证修复是否成功:

    漏洞修复验证:

  • 使用uname –a查看 Linux 系统的内核版本,如: Linux AYxxxx 2.6.32-431.23.3.el6.x86_64 #1 SMP Thu Jul 31 17:20:51 UTC 2014 x86_64 x86_64 x86_64 GNU/Linux 上述内核版本2.6.32-431.23.3.el6.x86_64受漏洞影响。 Linux AYxxxx 2.6.18-308.el5 #1 SMP Tue Feb 21 20:06:06 EST 2012 x86_64 x86_64 x86_64 GNU/Linux 上述内核版本2.6.18-308.el5不受漏洞影响。

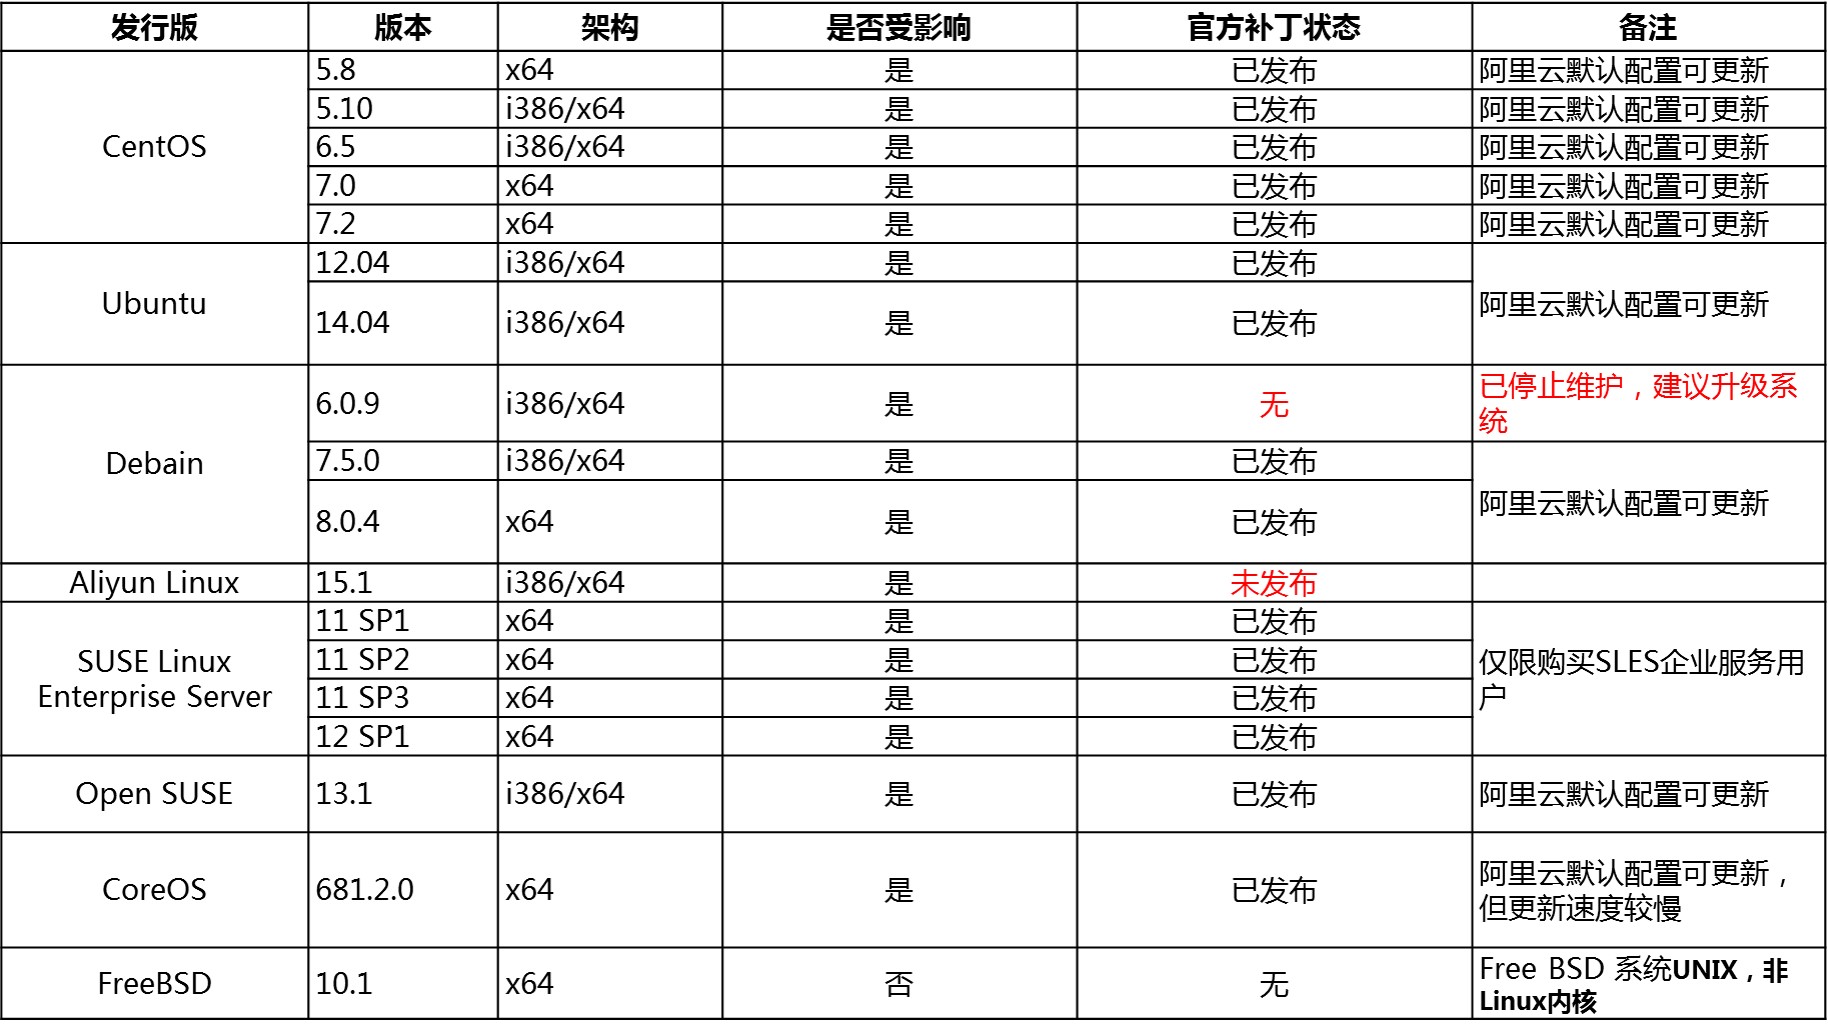
  1. 阿里云安全团队在第一时间针对 ECS 提供的 Linux 操作系统镜像进行测试,详细的受影响范围如下表:

漏洞修复方案

因为涉及到操作系统内核的升级,我们强烈建议您:正确关闭正在运行的服务,并做好业务数据备份工作。同时创建服务器磁盘快照,避免修复失败造成不可逆的影响。

1.CentOS 5/6/7 系列操作系统

阿里云已经更新了CentOS 5/6/7Aliyun mirror源,可以直接在默认配置下,您可以更新软件列表,随后一键升级内核: 1).检查是否有内核升级包:yum check-update |grep kernel 2).升级内核:yum update kernel 3).确认下新版本的内核或 initrd/initramfs 是否有xen-vbd和virtio_blk驱动:lsinitrd /boot/initramfs-2.6.32-642.6.2.el6.x86_64.img |grep -i -E 'xen-blkfront|virtio_blk

  • 查看补丁样例:

    #lsinitrd /boot/initramfs-2.6.32-642.6.2.el6.x86_64.img |grep -i -E 'xen-blkfront|virtio_blk'(具体是版本而定,可以到cd /boot/ 目录下面查看对应的initrd文件(Centos5.1)或initramfs文件(centos6/7))

    # lsinitrd /boot/initramfs-2.6.32-642.6.2.el6.x86_64.img |grep  -i -E 'xen-blkfront|virtio_blk'
    

4).如果有,则可以重启 5).如果没有,则需要给initrd/initramfs安装驱动,然后执行第三步后重启:

  • centos 5:

    #mkinitrd -f --allow-missing \
    

    (具体是版本而定,可以到cd /boot/ 目录下面查看,替换$target_initrd $vmlinuz)

  • centos 6、7 :

    #mkinitrd -f --allow-missing \

安装驱动样例(本样例以Centos6.8 64bit为准):

#mkinitrd -f --allow-missing --with=xen-blkfront --preload=xen-blkfront --with=virtio_blk --preload=virtio_blk --with=virtio_pci --preload=virtio_pci --with=virtio_console --preload=virtio_console initramfs-2.6.32-642.6.2.el6.x86_64.img 2.6.32-642.6.2.el6.x86_64

具体是版本而定,可以到cd /boot/ 目录下面查看,替换$target_initrd $vmlinuz 6).执行第三步后,查看是否有驱动,然后重启系统

# lsinitrd /boot/initramfs-2.6.32-642.6.2.el6.x86_64.img |grep -i -E 'xen-blkfront|virtio_blk'

7).查看升级后的内核版本:uname -a或者rpm -q --changelog kernel | grep 'CVE-2016-5195',也可以使用云盾安骑士验证 注:更新完毕后可能会安装两个内核,但不影响系统运行。

# uname -a

或者

#rpm -q --changelog kernel | grep 'CVE-2016-5195'

Ubuntu 系列操作系统

阿里云已经更新了Ubuntu mirror源,可以直接在默认配置下,您可以更新软件列表,随后一键升级内核: 1).查看是否有更新包:dpkg -l | grep linux 2).更新包列表:apt-get updateor apt update 3).升级内核: Ubuntu12.04版本:apt-get install linux-genericUbuntu14.04版本:apt-get upgrade或apt upgrade 4).然后重启系统 5).查看升级后的内核版本:uname -a或者zcat /usr/share/doc/linux-image-3.13.0-101-generic/changelog.Debian.gz | grep -i 'CVE-2016-5195',也可以使用云盾安骑士验证 注:更新完毕后可能会安装两个内核,但不影响系统运行。

# uname -a

或者

# zcat /usr/share/doc/linux-image-3.13.0-101-generic/changelog.Debian.gz | grep -i 'CVE-2016-5195'

3.Debian 系列操作系统

阿里云已经更新了Ubuntu mirror源,可以直接在默认配置下,您可以更新软件列表,随后一键升级内核: 1).查看是否有更新包:dpkg -l | grep linux 2).更新包列表:apt-get update 3).升级内核:apt-get upgrade 4).然后重启系统 5).查看升级后的内核版本:uname -a或者zcat /usr/share/doc/linux-image-3.16.0-4-amd64/changelog.Debian.gz | grep -i 'CVE-2016-5195',也可以使用云盾安骑士验证 注:更新完毕后可能会安装两个内核,但不影响系统运行。

# uname -a

或者

# zcat /usr/share/doc/linux-image-3.16.0-4-amd64/changelog.Debian.gz |grep -i 'CVE-2016-5195'

4.SUSE Linux Enterprise Server 系列操作系统(仅限购买SLES企业服务用户

**1).**使用http://mirrors.aliyuncs.com/SLES/SLES12-SP1-Updates/sle-12-x86_64/ 源进行更新,您可以编辑vim /etc/zypp/repos.d/SLES12-SP1-Updates.repo关闭其他更新源,即:修改http://mirrors.aliyun.com/SLES/SLES12-SP1-Updates/sle-12-x86_64/ enabled=0,然后更新列表:zypper refresh 2).安装最新内核:zypper install kernel-default xen-kmp-default 3).确认下新版本的内核或 initrd / initramfs 是否有xen-vbd和virtio_blk驱动:lsinitrd /boot/initrd-3.12.62-60.64.8-default | grep -i -E 'xen-vbd|virtio_blk'

  • 查看补丁样例:

    lsinitrd /boot/initrd-3.12.62-60.64.8-default | grep -i -E 'xen-vbd|virtio_blk'

    Arguments:--logfile --force --force-drivers 'xen-vbd xen-vnif xen-platform-pci.ko virtio virtio_console virtio_net virtio_blk virtio_pci'
    

4).如果有,可以重启 5).如果没有,则需要给 initrd / initramfs 安装驱动,然后执行第三步后重启:mkinitrd -k /boot/vmlinuz-3.12.62-60.64.8-default -i /boot/initrd-3.12.62-60.64.8-default(具体版本根据实际安装为准) 6).查看升级后的内核版本:uname -a或者rpm -q --changelog kernel | grep 'CVE-2016-5195',也可以使用云盾安骑士验证 注:更新完毕后可能会安装两个内核,但不影响系统运行。

# uname -a

或者

# rpm -q --changelog kernel-default | grep 'CVE-2016-5195'

5.Open SUSE 系列操作系统

**1).更新列表:**zypper refresh **2).安装最新内核:**zypper install kernel-default xen-kmp-default 3).确认下新版本的内核或 initrd / initramfs 是否有xen-vbd和virtio_blk驱动lsinitrd /boot/initrd-3.12.62-55-default | grep -i -E 'xen-vbd|virtio_blk'

  • 样例:

    # lsinitrd /boot/initrd-3.12.62-55-default | grep -i -E 'xen-vbd|virtio_blk'

    lib/modules/3.12.62-55-default/kernel/drivers/block/virtio_blk.ko

    lib/modules/3.12.62-55-default/updates/blkfront/xen-vbd.ko

4).如果有,可以重启 5).如果没有,则需要给 initrd / initramfs 安装驱动,然后执行第三步后重启:# mkinitrd -k /boot/vmlinuz-3.12.62-55-default -i /boot/initrd-3.12.62-55-default(具体版本根据实际安装为准) 6).查看升级后的内核版本:uname -a或者rpm -q --changelog kernel | grep 'CVE-2016-5195',也可以使用云盾安骑士验证 注:更新完毕后可能会安装两个内核,但不影响系统运行。

# uname -a

或者

# rpm -q --changelog kernel-default | grep 'CVE-2016-5195'

6.CoreOS 系列操作系统

安装所有可用更新,包括新内核:

update_engine_client -update

7.重要提示

  • 1). 对于阿里云官方发布的其余系列的操作系统,Linux 官方正在研发漏洞对应的系统补丁,待补丁发布后,将系统更新到最新版本即可修复漏洞。

  • 2). 对于自定义镜像用户可以关注操作系统原厂商更新状态,自己根据自身业务判断升级内核,修复该漏洞。

参考资料

最后更新时间:2016.11.03 13:01

linux上公钥的位置在 ~/.ssh/authorized_keys 但是openwrt毕竟不是linux,auth keys 位置放在  /etc/dropbear 目录下 so, 执行以下命令即可

ln -s ~/.ssh/authorized_keys /etc/dropbear/authorized_keys

0%